Give it up my sweet friend! You cannot resist the temptation of this recipe. I am literally bouncing in my kitchen chair just thinking about sharing Fluffy Strawberry Shortcake Puppy Chow: Dreamy Dessert Mix! with you today.
This is the snack mix of your dreams. It’s sweet, it’s crunchy, and it’s ridiculously fun to make. Get ready to fall in love with every single bite, just like you would with our savory herb garlic butter chicken breasts.
Recipe Overview
Let’s get a quick look at what we’re making together. This is your roadmap to sweet snack success!
- Cuisine: American
- Category: Dessert, Snack
- Prep Time: 15 minutes
- Cook Time: 0 minutes
- Total Time: 15 minutes
- Servings: 8 cups
Do You Love This Recipe Too?
I first made this for a girls’ movie night, and it was gone in about five minutes flat. My friends were literally scraping the bowl!
It reminded me of being a kid, but all grown up and fancy. Now, it’s my go-to for any occasion that needs a little extra joy.
Seeing people’s faces light up when they try it is my absolute favorite thing. It’s pure, unadulterated happiness in a bowl.
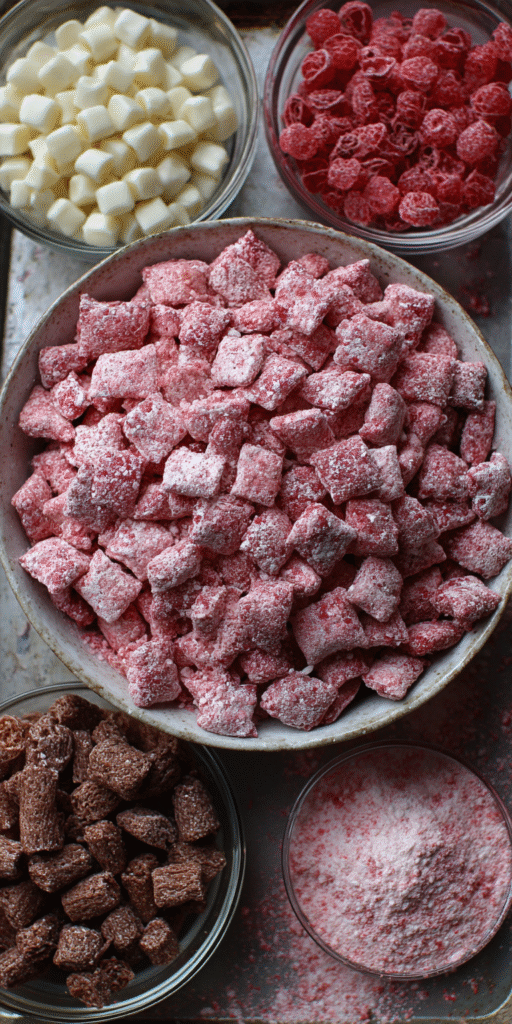
My Shopping List for This Recipe
Gathering your ingredients is the first fun step! I love the bright colors of the strawberry items.
It feels like you’re shopping for a party. Here’s what you’ll be looking for at the store.
Let’s Get Your Ingredients Ready
Okay, let’s lay everything out. This makes the process so smooth and easy, I promise.
Pre-measuring is a total game-changer for no-bake recipes like this one. You’ll be a pro in no time, whether you’re making this dessert or a delicious lemon garlic butter chicken dinner!
Fluffy Strawberry Shortcake Puppy Chow: Dreamy Dessert Mix! Recipe
Let’s Get Your Ingredients Ready
Bringing This Recipe to Life (Step-by-Step)
How to Store, Freeze, and Reheat
Notes
Enjoy your homemade Fluffy Strawberry Shortcake Puppy Chow: Dreamy Dessert Mix! Recipe!
Nutrition Information
- 8 cups Rice Chex cereal
- 1 cup white chocolate chips
- 1/4 cup freeze-dried strawberries, crushed
- 1/2 cup strawberry cake mix (the dry powder)
- 1/4 cup powdered sugar
- 2 tablespoons unsalted butter
- 1/4 cup vanilla frosting (from a can is perfect!)
Bringing This Recipe to Life (Step-by-Step)
Here we go! This is where the magic happens. It’s so simple and satisfying to put together.
Follow these steps and you’ll have a perfect snack mix. I believe in you!
- Start with a big bowl. Pour your 8 cups of Rice Chex cereal into a very large mixing bowl. We need plenty of room to toss everything.
- Melt the good stuff. In a medium, microwave-safe bowl, combine the white chocolate chips, butter, and vanilla frosting. Heat in 30-second intervals, stirring well each time, until it’s completely smooth and melted.
- Combine and coat. Pour the melted white chocolate mixture over the cereal. Use a spatula to gently fold and toss until every single piece is beautifully and evenly coated. Be patient here for the best coverage!
- Add the strawberry power. In a separate small bowl, whisk together the dry strawberry cake mix and the crushed freeze-dried strawberries. Sprinkle this powder over the coated cereal.
- The final toss. Gently toss everything again to distribute that gorgeous pink strawberry flavor all over the mix. This is where it starts to smell incredible.
- Dust with sweetness. Add the powdered sugar to the bowl. Give it one last, gentle toss to create that classic, dreamy puppy Chow look.
- Let it set. Spread the mix out on a large baking sheet lined with parchment paper. Let it sit for about 30 minutes so the coating can set up perfectly.
Fun Variations to Try Next Time
Once you’ve mastered the classic, get creative! It’s so fun to play with flavors.
These are a few of my favorite twists that always impress a crowd.
- Funfetti Party: Swap the strawberry cake mix for funfetti cake mix and add a handful of rainbow sprinkles with the powdered sugar.
- Chocolate Covered Strawberry: Use milk or dark chocolate chips instead of white chocolate for a richer, deeper flavor.
- Lemon Berry Bliss: Use lemon cake mix and dried blueberries for a bright, tangy, and totally refreshing summer mix.
How to Store, Freeze, and Reheat
You’ll want to keep this treat fresh and delicious! Proper storage is key.
Follow these simple tips to enjoy your hard work for days to come, just like you would with a comforting crockpot chicken potatoes and green beans meal.
- Store: Keep it in an airtight container at room temperature. It will stay perfectly fresh and crunchy for up to 5 days.
- Freeze: Yes, you can freeze it! Place it in a freezer-safe bag or container for up to 2 months. Let it thaw at room temperature for an hour before serving.
- Reheat: This snack is best enjoyed at room temperature. If it feels a little soft, you can spread it on a baking sheet and pop it in a 250°F oven for 5-10 minutes to re-crisp.
NUTRITION INFORMATION
- Serving Size: 1/2 cup
- Calories: 150
- Sugar: 12g
- Sodium: 95mg
- Fat: 5g
- Saturated Fat: 3g
- Carbohydrates: 25g
- Fiber: 1g
- Protein: 2g
A Quick Q&A on This Recipe
I get so many questions about this mix! Here are the answers to the most common ones.
Don’t ever be shy about asking for help. We’re in this together!
Can I use a different cereal?
You absolutely can! Corn Chex or even Crispix work wonderfully here. The key is using a cereal that’s light and will hold the coating well without getting soggy.
My coating is clumping. What did I do wrong?
Don’t worry, this happens! It usually means your melted mixture was a touch too hot when you poured it on. Just break up the big clumps with your fingers or a fork. It will still taste absolutely amazing, I promise.
Is the cake mix safe to eat raw?
This is a great question for all you fellow bakers! The amount used in this recipe is very small and is considered safe for consumption by most. If you have specific concerns, look for a “no-heat treat” cake mix variety or use one that uses heat-treated flour.
And there you have it! Your very own batch of pure, snackable joy. This recipe is a true crowd-pleaser and so simple to whip up.
I am so excited for you to try this. I can’t wait to hear how yours turns out! Please leave a comment and a rating below to let me know what you think!